
Pokud jde o výběr ve Photoshopu, existují opravdu dva typy lidí - ti, kteří vědí, jak používat nástroj pero, a ti, kteří bojují. Většina lidí odkládá učení, jak používat nástroj pero co nejdéle, zatímco jiní se nikdy k učení neučí, věří, že je to prostě příliš matoucí, příliš komplikované a prostě prosté nepřirozené.
Jejich práce ve Photoshopu to nakonec trpí, protože se spoléhají na Lasso Tool pro téměř vše, co si nemohou vybrat pomocí nástrojů Rectangular nebo Eliptical Marquee Tools. V tomto výukovém programu Adobe Photoshop ukončíme utrpení. Naučíme se, jak snadné je provádět výběr pomocí nástroje Pen.
Když teď řeknu „snadné“, nemyslím tím, že si přečtete tento tutoriál a okamžitě se změní na Pen Master. Naučit se používat nástroj pero je hodně jako naučit se jezdit na kole. Jakmile se naučíte, bude to vypadat zcela přirozeně a budete se divit, jak někdo nemohl vědět, jak používat něco tak jednoduchého. Ale dostat se do tohoto bodu vyžaduje trochu praxe a úsilí a při čtení každé knihy je o tom, jak jezdit na kole, vás mohou naučit základy toho, jak fungují pedály, rychlostní stupně a brzdy, dokud není na kole bojovat udržet rovnováhu, že skutečné učení začíná.
Jednou z velkých věcí na nástroji Pen Tool je to, že to není něco, co je exkluzivní pro Photoshop. Daleko od toho! Prakticky každý oblíbený program pro úpravu fotografií, grafiku a rozvržení stránek používá nástroj pero v té či oné podobě, takže jakmile se naučíte, jak jej používat ve Photoshopu, budete již dobře rozumět tomu, jak jej použít ve spoustě další programy!
Kde najdu nástroj pero?
Než začneme mluvit o tom, co je Pen Tool nebo jak jej používat, měli bychom se nejprve podívat, kde je najít ve Photoshopu. Nástroj pero najdete v paletě Nástroje, seskupené podle nástrojů Tvar, Typový nástroj a Výběr cesty (bílá šipka) a Přímý výběr (černá šipka) Nástroje (viz obrázek vlevo).
Photoshop's Pen Tool
To samozřejmě může vyvolat otázku, proč, pokud můžeme provést výběr pomocí nástroje pero, není to seskupeno do jiných nástrojů pro výběr (nástroj obdélníkového ohraničení, nástroj eliptického ohraničení, nástroj laso atd.) Na horní část palety Nástroje? Proč je to tam s těmi dalšími nástroji, které zjevně nejsou nástroji pro výběr?
To je vynikající otázka, a prostě se stane, že bude stejně vynikající odpověď, abychom s ní šli, na kterou se za chvíli dostaneme.
Proč se tomu říká nástroj „pero“?
Jedním z prvních kamenů úrazu, který se naučil, jak používat nástroj Pen, jak je tomu u mnoha jiných věcí ve Photoshopu, je jeho jméno, protože nakonec, pokud existuje jedna věc, kterou zná každý, kdo se ji někdy pokusil použít, tato věc není pero. Alespoň ne takový druh pera, na který byste normálně mysleli, když uslyšíte slovo "pero". Zkuste s ní napsat své jméno stejným způsobem, jak byste mohli své jméno podepsat na kus papíru perem, a pravděpodobně skončíte krouceným, spletitým nepořádkem a věcmi, které se kolem sebe opakují (samozřejmě předpokládám, že mohlo by se velmi dobře stát, jak podepíšete své jméno).
 Pierre Bezier
Takže pokud to nefunguje jako tradiční inkoustové pero, proč se tomu říká Pen Tool? Nástroj Pen byl v průběhu let nazýván několika věcmi, a tím nemyslím ty věci, které jste mohli nazvat v okamžicích frustrace. Možná jste to slyšeli označované jako Bezierovo pero nebo Bezierův nástroj, a to proto, že bylo vytvořeno mužem jménem Pierre Bezier (to je on vlevo), francouzským inženýrem a všestranným chytrým chlapem, který přišel s ozdobná matematika, která pohání tento nástroj při práci pro automobilovou společnost Renault (Pen Tool byl původně vytvořen s cílem navrhnout auta).
Možná jste také slyšeli Nástroj pero, který se označuje jako Nástroj cesty, a to je pro něj vlastně nejvhodnější název. Nástroj Pen je o kreslení „cest“. Chcete-li provést výběr pomocí nástroje pero, jednoduše převedeme cestu nebo cesty, které jsme nakreslili, na výběr. Vždy to však začíná cestou.
Plugin pro krátké kódy, akce a filtry: Chyba v krátkém kódu (ads-basics-middle-2)
Co je cesta?
"Cesta" je, docela upřímně, něco, co se může zdát trochu mimo místo uvnitř programu, jako je Photoshop. Důvod je ten, že Photoshop je primárně program založený na pixelech . Trvá miliony malých čtverečních pixelů, které tvoří typický digitální obraz a dělají s nimi věci. Cesty na druhé straně nemají absolutně nic společného s pixely, proto jsem řekl, že se mohou zdát na místě v programu, který se používá hlavně pro editaci a kreslení pixelů.
Cesta není opravdu nic jiného než čára, která jde z jednoho bodu do druhého, čára, která je zcela nezávislá na pixelech pod ní a nezajímá ji. Řádek může být přímý nebo zakřivený, ale vždy jde z jednoho bodu do druhého, a jak jsem již zmínil, nemá vůbec nic společného s pixely v obrázku. Cesta je zcela oddělená od samotného obrázku. Ve skutečnosti je cesta tak samostatná, že pokud byste se pokusili vytisknout obrázek s cestou viditelnou na obrazovce, cesta by se neobjevila na papíře. Pokud jste obrázek uložili jako soubor JPEG.webp a nahráli jej na web, i když jste jej uložili s cestou viditelnou na obrazovce v aplikaci Photoshop, neuvidíte jej v obrázku na webu. Cesty jsou pouze pro vaše oči a Photoshop. Nikdo jiný je nikdy neuvidí, pokud náhodou neprojdou kolem vašeho počítače, když pracujete.
K vytvoření cesty vždy potřebujeme minimálně dva body, protože musíme vědět, kde cesta začíná a kde končí. Použijeme-li dostatek bodů, abychom mohli přivést naši cestu zpět do stejného bodu, ze kterého vycházelo, můžeme z cest vytvořit různé tvary, což je přesně to, jak fungují různé Tvarové nástroje Photoshopu. Nástroj Obdélník používá k nakreslení obdélníkového tvaru cesty spojené body. Nástroj Ellipse Tool používá cesty, spojené body, k vykreslení eliptického tvaru atd. Je to také způsob, jak Photoshopův typový nástroj funguje, i když úchyty Photoshopu psají trochu jinak, než to, že zpracovává běžné tvary, ale všechny typy ve Photoshopu jsou v zásadě vyrobeny z cest. Ve skutečnosti můžete převést typ na obrazce, což vám poskytne všechny stejné možnosti úpravy cesty s typem, který získáte při práci s obrazci.
Možná jste také slyšeli cesty označované jako obrysy, a to je docela dobrý popis toho, co je cesta, nebo alespoň to, co může být cesta. Můžeme nakreslit čtvercovou cestu, a pokud s tím neuděláme nic jiného, jako kdybychom ji nenaplnili barvou ani na ni nevydali tah, pak máme pouze základní obrys čtverce. Stejné jako u kruhu nebo jiného tvaru, který nakreslíme. Cesta samotná je pouze obrysem tvaru. Teprve když něco uděláme s cestou, jako ji naplníme, aplikujeme tah nebo převedeme na výběr, cesta se ve skutečnosti stane něčím víc než jen základním obrysem.
Můžete vybrat celou cestu pomocí nástroje pro výběr cesty (známého také jako nástroj „černá šipka“), nebo můžete vybrat jednotlivé body nebo segmenty cesty pomocí nástroje pro přímý výběr (nástroj „bílá šipka“). Cesta „segment“ nebo „úsečka“, jak se někdy říká, je jakákoli cesta mezi dvěma body. Například obdélníková cesta by byla tvořena čtyřmi body (jeden v každém rohu) a jednotlivé cesty spojující tyto body podél horního, dolního, levého a pravého k vytvoření tvaru obdélníku jsou segmenty cest . Samotná skutečná cesta je kombinací všech jednotlivých úseků cesty, které tvoří tvar.
To může být trochu matoucí, tak se podívejme, co tím myslím. Otevřete nový dokument v aplikaci Photoshop. Nezáleží na tom, jaká je velikost. Ze seznamu předvoleb vyberu velikost 640x480, ale jak jsem řekl, nezáleží na tom, jakou velikost si vyberete. Vyberte svůj nástroj pero z palety nástrojů. Nástroj Pero můžete také vybrat jednoduše stisknutím písmene P na klávesnici.
Režimy s dvěma pery
Než budeme pokračovat, musíme se nejprve ujistit, že pracujeme s cestami, a to proto, že nástroj pero ve skutečnosti má dva různé režimy, ve kterých může pracovat, a ve výchozím nastavení používá ten druhý. Pokud je vybrán nástroj pero, podíváme-li se na panel Možnosti v horní části obrazovky, zobrazí se skupina tří ikon:

Panel Možnosti ve Photoshopu ukazuje skupinu tří ikon představujících každý ze tří režimů Nástroje pera.
Vím, že jsem řekl, že existují dva režimy, ve kterých může nástroj Pen pracovat, a přesto, jako by to dělalo matoucí věci, jsou tři ikony, ale ikona vpravo, což je ikona výplňových pixelů, je při práci šedá a není k dispozici při práci pomocí nástroje pero. Je k dispozici pouze při práci s různými nástroji Tvarové nástroje, takže ve skutečnosti potřebujeme jen dvě ikony.
Ikona vlevo je ikona Vrstev tvaru, známá také jako „ne ta, kterou chceme“, a je to ta, která je vybrána ve výchozím nastavení. Kdybychom pracovali s nástrojem pero s vybranou ikonou, kreslili bychom tvary, jako bychom používali některý z různých nástrojů pro tvarování, kromě toho, že namísto kreslení předdefinovaného tvaru, jako je obdélník nebo elipsa, mohl nakreslit jakýkoli tvar, který jsme chtěli. Jak jsem však řekl, to není to, co chceme. Chceme ikonu vedle ní, ikonu Cesty, takže ji vyberte a kliknutím na ni ji vyberte:

Výukové programy Photoshopu: Klikněte na ikonu „Cesty“ na panelu Možnosti, abyste mohli pracovat s cestami pomocí nástroje Pero.
S vybraným nástrojem pero a ikonou Cesty na panelu Možnosti klepněte kdekoli uvnitř dokumentu. Neklikejte a přetahujte, stačí kliknout. Když to uděláte, přidáte malý čtvercový bod. Zde jsem to rozšířil:

Klikněte jednou do dokumentu pomocí nástroje pero a přidejte bod.
Tento první bod, který jsme právě přidali, je výchozím bodem naší cesty. Nyní nemáme ve skutečnosti žádnou cestu. Vše, co máme, je výchozí bod. „Bod“ se technicky nazývá kotevní nebo kotevní bod a je pojmenován, protože ukotvuje cestu na místo. Tento první bod ukotví začátek cesty k tomuto místu uvnitř dokumentu. Když přidáváme další body, každý z nich ukotví cestu na místo v tomto místě.
Pojďme přidat další bod. Klepněte někam jinam uvnitř dokumentu. Kdekoli udělá. Kliknu někam napravo od mého původního bodu:

Výukové programy Photoshopu: Přidejte druhý kotevní bod kliknutím někde jinde v dokumentu.
Nyní jsem přidal druhý kotevní bod a podívejte se, co se stalo. Nyní mám přímku spojující dva body dohromady! Tato přímka je moje cesta. Jak jsem již zmínil dříve, k vytvoření cesty potřebujeme minimálně dva body, protože potřebujeme vědět, kde cesta začíná a kde končí, a nyní, když máme jak počáteční, tak konečný bod, Photoshop byl schopen propojit dva body dohromady, vytvářející naši cestu.
Pojďme přidat ještě pár bodů jen pro zábavu. Klikněte několikrát na různá místa v dokumentu. Opět neklikejte a netahejte, stačí kliknout:
Přidejte další body kliknutím na různých místech uvnitř dokumentu.
Na obrázku výše jsem přidal sedm dalších kotevních bodů kliknutím na různá místa pomocí nástroje pero a pokaždé, když jsem přidal jeden, délka mé cesty se zvětšila, protože mezi předchozí bod byl přidán nový „segment“ cesty. nový bod. Moje cesta nyní obsahuje devět kotevních bodů a osm segmentů cesty. Mohl bych pokračovat v klikání kolem uvnitř dokumentu a přidávat další kotevní body a segmenty cest, ale to, co bych nyní chtěl udělat, je zavřít cestu, takže tvoří úplný tvar.
Uzavření cesty
K uzavření cesty stačí kliknout znovu na náš počáteční bod. Když umístíte kurzor myši na počáteční bod, zobrazí se v pravém dolním rohu ikony pera malý kruh:

Když umístíte kurzor na počáteční počáteční bod cesty, objeví se v pravém dolním rohu ikony pera malý kruh.
Tento kruh nám říká, že se chystáme na naši cestu „plným kruhem“ a dokončíme ji tam, kde to začalo. Chcete-li jej zavřít, stačí kliknout přímo na počáteční bod.
Níže vidíme, že moje cesta se stala uzavřenou cestou a nyní je základním obrysem tvaru:
Cesta je nyní uzavřená, končí v počátečním bodě a vytváří uzavřenou cestu.
Přestože byla tato cesta nakreslena jen pro zábavu, jako příklad toho, jak nakreslit základní cestu pomocí nástroje Pen, mohu ji snadno změnit na výběr. K tomu potřebujeme paletu Paths aplikace Photoshop a my se na to podíváme dále.
Otočení cesty do výběru
Zatím jsme se podívali na to, co je cesta a jak nakreslit základní cestu pomocí nástroje Photoshop's Pen Tool. Jak ale postupujete při výběru z cesty?
Snadný! Existuje několik způsobů, jak změnit cestu na výběr, včetně užitečné klávesové zkratky, ale než se podíváme na rychlý způsob, podívejme se na oficiální způsob. „Oficiální cesta“ zahrnuje použití palety Cesty Photoshopu, kterou najdete seskupenou s paletou Vrstvy a Paletou Kanály:
Paleta Cesty Photoshopu.
Na první pohled vypadá paleta Cesty velmi podobná paletě Vrstvy Photoshopu a Adobe ji takto záměrně vytvořila, takže ji budete cítit pohodlněji. Vidíme náhled miniatury tvaru cesty, kterou jsme právě vytvořili, a ve výchozím nastavení Photoshop pojmenuje cestu „Pracovní cesta“, což je v podstatě fantastický způsob, jak říci „dočasný“, jako kdybyste vytvořili jiný cesta nyní bez přejmenování této cesty k něčemu jinému nejprve, tato by byla nahrazena novou cestou. Můžete mít pouze jednu „pracovní cestu“, takže pokud si ji chcete ponechat, budete muset před vytvořením nové cesty dvakrát kliknout na její název v paletě Cesty a pojmenovat něco jiného.
Vzhledem k tomu, že moje cesta vypadá trochu jako koruna, budu dvakrát kliknout na jméno „Pracovní cesta“, které se zobrazí v dialogovém okně Uložit cestu Photoshopu, a přejmenuji svou cestu „Koruna“:

Dočasnou pracovní cestu můžete uložit jednoduše jejím přejmenováním.
Až budu hotový, klepnu na tlačítko OK a nyní, když se znovu podívám na svou paletu Cesty, vidím, že je moje „Pracovní cesta“ přejmenována na „Koruna“:
Paleta Cesty ukazuje, že cesta byla přejmenována na „Koruna“.
Přejmenováním je cesta nyní uložena a nezmizí, pokud se chystám vytvořit novou cestu. Všechny uložené cesty se ukládají také s dokumentem Photoshopu, takže pokud nyní uložím dokument, cesta se uloží spolu s ním a při příštím otevření dokumentu bude cesta stále v paletě Cesty.
Uložení cesty není něco, co musíte udělat, aby se z ní stal výběr. Ve většině případů, když používáte nástroj pero k výběru, nebudete potřebovat cestu, jakmile z ní vyberete, takže ji nebudete muset ukládat. Pokud jste ji však chtěli uložit, přejmenujte ji na něco jiného než „Pracovní cesta“ a je to uloženo.
Chcete-li změnit cestu na výběr, podíváme-li se na konec palety Cesty, uvidíme několik ikon. Tyto ikony nám umožňují dělat různé věci s naší cestou. První ikona vlevo je ikona Vyplnit cestu ikonou barvy popředí, a jak napovídá její název, kliknutím na ni vyplníte naši cestu naší aktuální barvou popředí. Zajímavé, ale to není to, co chceme. Druhou ikonou zleva je dráha tahu s ikonou štětce, která aplikuje tah na naši cestu pomocí toho, co jsme právě vybrali.
Je to skvělý způsob, jak ve Photoshopu vytvořit zajímavé efekty, ale pro to, co zde děláme, přeměním cestu na výběr, to také není to, co chceme. To, co chceme, je třetí ikona zleva, cesta Load jako ikona výběru:
Ikona „Načíst cestu jako výběr“ ve spodní části palety Cesty.
Jakmile kliknu na tuto ikonu, moje cesta uvnitř dokumentu se stane výběrem, jako kdybych ji vytvořil pomocí některého z běžnějších nástrojů pro výběr Photoshopu:
Cesta byla nyní převedena na výběr.
Je to tak snadné! Ve skutečnosti je to dokonce ještě jednodušší, protože existuje klávesová zkratka pro přeměnu cesty na výběr, aniž byste museli vůbec přepínat na paletu Cesty. Když jste nakreslili cestu a jste připraveni ji proměnit ve výběr, stačí stisknout Ctrl + Enter (Win) / Command + Return (Mac), aby aplikace Photoshop cestu převedla na výběr.
Nyní vám může být trochu jasnější, proč, i když je Nástroj pero ve velké míře nástrojem pro výběr, není seskupen s ostatními nástroji pro výběr v horní části palety Nástroje. Důvod je ten, že nástroj pero je primárně nástrojem cesty. Vytváří výběry tím, že nejprve vytvoří cesty, a proto má více společného s různými nástroji Tvar a Nástrojem pro psaní, z nichž všechny používají cesty, než se základními nástroji pro výběr, jako je nástroj Obdélníkový rámeček nebo Lasso. Nástroj, který provádí výběr pouze na základě pixelů.
Podívejme se na praktický příklad toho, co jsme se dosud naučili. Tady máme fotku stopky před některými skalnatými útesy:

Fotografie značky stop.
Řekněme, že jsem chtěl vybrat stopku, abych ji mohl zkopírovat do své vlastní vrstvy. Značka stop se skládá z ničeho jiného než ze série přímek, což to velmi usnadní. Nejprve potřebuji počáteční bod pro svou cestu, takže začnu v levém horním rohu cedule kliknutím na místo, kde umístím počáteční kotevní bod. V tomto případě nezáleží na tom, kde začnu cestu, ale začnu v levém horním rohu:
Jedním kliknutím v levém horním rohu značky stop zahájíte cestu počátečním kotevním bodem.
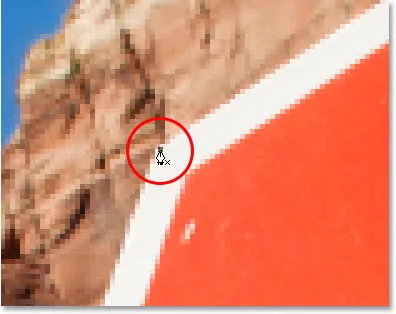
Všimněte si, jak jsem zde přiblížený, když kliknu. Zjednodušení při výběru pomocí nástroje Pero pro malé zvětšení obrázku. Tímto způsobem si můžete být jisti, že udržujete svou cestu právě uvnitř oblasti, kterou chcete vybrat.
V tuto chvíli nemám cestu, mám pouze výchozí bod pro svou cestu. Abychom vytvořili cestu, vše, co musím udělat, je obejít značku a přidat kotevní bod v každém rohu, kde cesta musí změnit směr. Když přidávám každý kotevní bod, objeví se nový segment cesty, který spojuje předchozí kotevní bod s novým, dokud jsem neprošel celou cestu kolem značky. Chcete-li cestu uzavřít, jednoduše klikněte zpět na počáteční počáteční bod. Na obrázku níže je trošku těžké vidět, ale teď mám cestu kolem celé značky stop, včetně příspěvku, ke kterému je připojena, pouhým kliknutím kolem v rozích, kde cesta potřebuje změnit směr:

Cesta se nyní objeví kolem značky stop na obrázku.
Když se nyní podívám na svou paletu Cesty, velmi jasně vidím, že mám cestu ve tvaru stopky:
Paleta Cesty Photoshopu ukazuje cestu nakreslenou kolem značky stop.
Všimněte si, jak Photoshop pojmenoval cestu „Pracovní cesta“, což znamená, že tato cesta je dočasná, a ztratím ji, pokud vytvořím jinou cestu, aniž bych ji nejprve nejprve přejmenoval přejmenováním. I když nevytvořím novou cestu, ztratím ji, když zavřu dokument, dokud ji neukládám jako první. Tuto cestu ale nemusím zachraňovat, takže si s tím nebudu dělat starosti. Ve většině případů se také nemusíte bát.
Chcete-li převést cestu na výběr, kliknu na ikonu Načíst cestu jako ikonu výběru v dolní části palety Vrstvy, nebo stejně snadno stisknu klávesy Ctrl + Enter (Win) / Command + Return (Mac):
Klikněte na ikonu „Načíst cestu jako výběr“ v paletě Cesty nebo stiskněte „Ctrl + Enter“ (Win) / „Command + Delete“ (Mac) a převeďte cestu do výběru.
Jakmile to udělám, moje cesta se převede na výběr a nyní je vybrána značka stop:

Značka zastavení je nyní vybrána po převedení cesty na výběr.
Vrátím se zpět do své palety Vrstvy a zkopíruji stopku do své vlastní vrstvy, použiji klávesovou zkratku Ctrl + J (Win) / Command + J (Mac), která umístí značku na její vlastní vrstva nad vrstvou pozadí:
Značka stop byla nyní zkopírována do vlastní samostatné vrstvy.
S nápisem nyní na jeho vlastní vrstvě, mohu dělat, co se mi líbí s ním, vyměňovat pozadí s jiným obrázkem, nebo aby pozadí černé a bílé, zatímco ponechává znamení v barvě, cokoli si pomyslím. Jde o to, že jsem mohl snadno vybrat znaménko kliknutím v rozích pomocí nástroje Pen, který vytvořil cestu kolem znaménka, a pak jsem ji jednoduše převedl na výběr.
Dosud jsme se při pohledu na výběr pomocí nástroje pero v aplikaci Photoshop dozvěděli, že pero je každý kousek nástrojem pro výběr, protože nástroje Photoshopu jsou běžnější nástroje pro výběr, jako je obdélníkový rámeček a nástroje pro laso, ale místo toho, aby se výběr prováděl na pixelech, jako to dělají ostatní nástroje, kreslí nástroj pero cesty, které lze poté snadno převést na výběry, buď z palety Cesty, nebo pomocí rychlé klávesové zkratky.
Proto se pero nenachází v horní části palety nástrojů s těmito dalšími nástroji pro výběr na základě pixelů, ale je místo toho seskupeno do nástrojů pro cesty, jako jsou různé nástroje tvaru, typový nástroj a nástroje pro výběr cesty a přímý výběr. . Nástroj Pen je zaměřen na cesty, nikoli na pixely.
Dozvěděli jsme se, že můžeme v našem dokumentu přidat kotevní body, které ukotvují cestu na místě, jednoduše kliknutím na různá místa pomocí nástroje Pero a když přidáváme další a další kotevní body, vytváříme cestu jako každý nový bod. je připojen k předchozímu bodu novým segmentem cesty. Také jsme se dozvěděli, že cesta je obvykle označována jako „netisknutelný prvek“, což znamená, že bez ohledu na to, kolik cest přidáme, žádná z nich nebude viditelná na papíře, když jdeme k tisku obrázku . Nebudou také viditelné, pokud zobrazíme obrázek na webu. Cesty jsou viditelné pouze pro nás, když pracujete uvnitř Photoshopu (i když jiné programy, jako je Adobe Illustrator, také podporují cesty). Teprve když něco uděláme s cestou, jako když ji vyplníme barvou, aplikujeme na ni tah nebo převedeme na výběr, cesta se stane něčím víc než jen základním, netisknutelným obrysem tvaru.
Viděli jsme, jak snadné by bylo použití nástroje pero k výběru něčeho, jako je značka zastavení, a to tak, že ji nastíní cesta tvořená řadou přímých segmentů cesty a poté ji změní na výběr. To je skvělé, ale ve skutečnosti jsme ještě neudělali nic, co bychom nemohli udělat snadněji s něčím, jako je Lasso Tool, nebo ještě lépe, Polygonal Lasso Tool, který byl vytvořen speciálně pro výběr plochých tvarů, jako je náš doraz podepsat. Je pravděpodobné, že pokud nebudete mít zvláštní podivnost s dopravními značkami, dříve či později si budete chtít vybrat něco trochu zajímavějšího a „zajímavým“ mám na mysli náročnější. A „výzvou“ mám na mysli něco, co obsahuje křivky. Výběr zakřiveného objektu ve Photoshopu je obvykle, když zjistíte, že ztrácíte veškerou úctu k základním nástrojům pro výběr. Naštěstí se také stane čas, kdy nástroj Pen opravdu svítí!
Než budeme pokračovat, měl bych zdůraznit, že všechno, co jsme do tohoto bodu udělali, bylo docela jednoduché. Klikněte sem, klikněte sem, převeďte cestu do výběru, hotovo. Tato další část, kde se dostaneme do kreslení křivek, není tak jednoduchá, i když to rozhodně není obtížné, ale pokud je to poprvé s Pen Tool nebo nemáte s ním mnoho zkušeností, práce s křivkami se může zdát trochu nepřirozené a dokonce trochu ohromující. To je určitě místo, kde přichází analogie „jízda na kole“. Nejprve se můžete několikrát zřítit a přemýšlet, jak to někdo zvládne, ale čím více si procvičujete a čím více se budete držet, tím více to bude mít smysl začíná dělat. V žádném okamžiku se vám to nebude zdát jako druhá příroda a najednou pochopíte, proč tolik lidí přísahá, že nástroj Pen je jediným největším nástrojem výběru ve Photoshopu! Vážně to opravdu je.
Získání úchytky na směrových úchytkách
Začněme znovu s nástrojem pero. Otevřete nový prázdný dokument Photoshopu nebo jednoduše odstraňte to, co jste dosud provedli v existujícím dokumentu, takže začínáme čerstvě. Poté, když je na panelu Možnosti vybrán nástroj pero a vybrána možnost Cesty (nezapomeňte, že je výchozí možnost Tvarové vrstvy, takže se musíte ujistit, že je vybrána možnost Cesty), klepněte jednou kamkoli v dokumentu, stejně jako už jsme to udělali. Tentokrát, místo pouhého klepnutí na přidání kotevního bodu, klikněte a poté přetáhněte myš na krátkou vzdálenost od kotevního bodu, než uvolníte tlačítko myši:
Klikněte kdekoli uvnitř dokumentu pomocí nástroje pero a poté přetáhněte krátkou vzdálenost od kotevního bodu.
Až budete hotovi, uvidíte kotevní bod se dvěma liniemi, které z něj vyčnívají. Na první pohled si můžete myslet, že se nám nějakým způsobem podařilo vytáhnout cestu nástrojem pero. Nakonec to vypadá, že máme tři kotevní body, jeden na obou koncích a jeden uprostřed, se dvěma segmenty cesty, které je spojují. Když se ale podíváme trochu blíže, můžeme vidět, že body na obou koncích jsou o něco menší než ve středu a že jsou ve skutečnosti odlišným tvarem. Ten uprostřed je čtverec, a jak jsme viděli, kotevní bod je čtverec, ale ty na obou koncích se zdají být ve tvaru diamantu. Jsou některé kotevní body hranaté a jiné ve tvaru kosočtverce?
Ani náhodou. Všechny kotevní body jsou hranaté a všechny mají stejnou velikost, což znamená, že menší, kosočtvercové body na koncích nejsou kotevními body. A pokud se nejedná o kotevní body, znamená to, že čáry nejsou segmenty cesty, protože k vytvoření cesty potřebujeme alespoň dva kotevní body a právě teď jediným kotevním bodem, který máme, je ten uprostřed. Jaké přesně jsou tedy ty linie, které se rozprostírají od kotevního bodu? Jsou to směrové kliky!
"Aha, směrové kliky!" říkáš. "Teď to chápu!"
… … …………….
„Počkej, ne, ne. Jaké jsou sakra směrové kliky?“
Směrové úchyty jsou, no, úchyty a používají se pouze při vytváření zakřivených úseků cesty. Při vytváření přímých úseků cesty není třeba používat směrové úchyty. Obvykle jsou dva, i když někdy je jen jeden, a jak jsme již viděli, vyčnívají z kotevních bodů. Říkají se jim „kliky“, protože jak uvidíme za chvíli, můžete je skutečně chytit a posunout je.
Směrové kliky ovládají dvě věci. Ovládají úhel křivky a řídí délku křivky a dělají to opravdu elegantně. Důvodem je, že obvykle dva jsou, protože jeden z nich řídí úhel a délku křivky přicházející do kotevního bodu a druhý řídí úhel a délku křivky vytékající z kotevního bodu.
Než se podíváme na to, jak nakreslit křivky pomocí úchytů, nejprve se podívejme, jak ovládat úchytky samotné, protože náš úspěch s nakreslením křivek bude hodně záviset na naší schopnosti ovládat úchytky. Nebojte se, není to, jak se říká, raketová věda. Musíte se naučit jen pár jednoduchých věcí. Už jsme viděli, jak vytvořit směrové úchyty, kliknutím na nástroj pero a poté tažením pryč od kotevního bodu. Čím dále od kotevního bodu táhneme, tím delší budou směrové úchyty. Čím delší rukojeť, tím delší je křivka. Krátká rukojeť, krátká křivka. Dlouhá rukojeť, dlouhá křivka.
Jednou z pěkných věcí, které se o nástroji Pen Tool dozvíte poměrně rychle, je to, že je nesmírně odpouštějící. Není vůbec důvod se obávat, že se věci dostanou do pořádku při kreslení cest, protože se můžeme snadno vrátit a opravit věci, až to uděláme! Umístili jste kotevní bod na špatné místo? Žádný problém! Jednoduše ji přesuňte tam, kde ji potřebujete! Uvidíme, jak to udělat za chvíli. Přetáhli jste úchytku směru nesprávným směrem? Není problem. Uchopte rukojeť a otočte ji ve směru, který potřebujete. Znovu uvidíme, jak to udělat. Je jeden z vašich směrových úchytů příliš dlouhý nebo příliš krátký? Vůbec žádný problém. Stačí na něj kliknout a podle potřeby jej přetáhnout delší nebo kratší (jo, uvidíme také, jak to udělat). Cesty jsou plně upravitelné za všech okolností, takže není absolutně důvod se obávat chyby nebo prvního opravení chyby. Nezdá se vám to, že už se cítíte trochu lépe?
Otočné a změnu velikosti úchytů
Jak jsem již zmínil, říkají se jim směrové úchyty, protože je můžete chytit jako úchytky a pohybovat je. Uvidíme, jak to udělat. Nejprve se podíváme na to, jak otočit obě držadla současně. Pomocí kotevního bodu a dvou směrových úchytů, které jsme již vytvořili, podržte klávesu Ctrl (Win) / Command (Mac). Ikona nástroje Pen se dočasně změní na ikonu nástroje pro přímý výběr (bílá šipka), a to proto, že se zvoleným nástrojem pro pero se podržením klávesy „Ctrl / Command“ stane rychlou zkratkou pro dočasný přístup k nástroji pro přímý výběr, který je co používáme k výběru různých částí naší cesty. Pak jednoduše klikněte přímo na malý kosočtvercový tvar na konci kterékoli ze směrových úchytů (kliknutí na „linii“ samo o sobě nebude fungovat, takže vždy musíte kliknout na kosočtvercový tvar na konci rukojeti, abyste udělali cokoli s ním) a přetáhněte jej kolem kotevního bodu a otočte jej. Když otáčíte jednou z úchytů, druhá úchytka se spolu s ní otáčí v opačném směru, podobně jako pila. Můžete si také všimnout, že jakmile táhnete za táhlo, ikona myši se změní znovu, tentokrát na ikonu Přesunout, protože přesouváme něco z jednoho místa na druhé:
Podržte "Ctrl" (Win) / "Command" (Mac) a klikněte na konec kterékoli ze směrových úchytů a poté tažením za úchyt otočte kolem kotevního bodu. Když táhnete jeden úchyt, druhý se otáčí opačným směrem.
Jakmile začnete táhnout za úchyt, můžete uvolnit klávesu "Ctrl / Command". Není třeba, aby to po celou dobu.
Chcete-li změnit velikost úchytky směru, když ji otáčíte, jednoduše přetáhněte konec úchytky směrem k kotevnímu bodu, abyste ji zkrátili, nebo ji přetáhněte pryč od kotevního bodu, abyste ji prodloužili. Jak jsem zmínil výše, kratší rukojeť zkrátí křivku a delší rukojeť prodlouží křivku. Nelze však změnit velikost obou úchytů současně, takže pokud potřebujete změnit velikost obou úchytů, budete muset každou z nich přetáhnout zvlášť delší nebo kratší. Jediné, co můžete udělat oběma současně, je jejich rotace. Pokud jste již tlačítko myši uvolnili po otočení úchytů a kurzor se změnil zpět na ikonu nástroje pero a je třeba změnit velikost jedné z úchytů, budete muset dočasně podržet stisknutou klávesu „Ctrl / Command“, abyste dočasně přepněte zpět na nástroj pro přímý výběr a poté kliknutím a přetažením konce popisovače změňte jeho velikost:
Přetáhněte konce úchytů směrem k kotevnímu bodu, abyste je zkrátili, nebo je přetáhněte od kotevního bodu, abyste je prodloužili.
Nyní se podívejme, jak otočit kliky nezávisle na sobě. To rotate one handle without affecting the other one, first release your mouse button if you've been rotating or resizing the handles so your cursor changes back into the Pen Tool icon. Then, instead of holding down "Ctrl/Command", which moves both handles at once, hold down your Alt (Win) / Option (Mac) key and click on the end of either of the direction handles. You'll see your cursor change into the Convert Point Tool icon, which looks like a simplified arrow made of only two lines, almost like an upside down letter "v" (except that it's not quite upside down). Then, simply drag the handle around the anchor point to rotate it, just as you did before, and this time, the handle will rotate independently of the other one, breaking the connection between them:
Hold down "Alt" (Win) / "Option" (Mac) and click on the end of either of the direction handles, then drag the handle to rotate it around the anchor point independently of the other handle.
Again, you can release your "Alt/Option" key after you've started dragging. You don't have to hold it down the whole time.
You can also resize direction handles using the "Alt/Option" key in exactly the same way as you can with the "Ctrl/Command" key. If you're in the process of rotating a handle, simply drag it in towards the anchor point to make it shorter or away from the anchor point to make it longer. If you've already released your mouse button and your cursor is showing the Pen Tool icon again, you'll need to hold down "Alt/Option" once again, then click on the end of the handle and drag it to resize it.
Is there a difference between resizing the handles using "Ctrl/Command" and using "Alt/Option" to do it? Yes there is. If you haven't yet "broken the connection" between the handles by dragging one independently of the other, resizing a handle using "Ctrl/Command" will keep the handles connected together. It won't resize both handles at once, but it won't break the connection between them either so you'll still be able to rotate them together if you need to. If you resize a handle using "Alt/Option", you'll break the connection between the handles. Even if you don't rotate the handle as you're resizing it, the connection will still be broken.
What if you've broken the connection between the handles by rotating them using "Alt/Option" and then want to rotate them together again? Can you "rebuild the connection", so-to-speak, by selecting one of them while holding down "Ctrl/Command" as before? Good question, and the answer is no. Once you've broken the connection between the handles, the "Ctrl/Command" key on its own won't bring it back. You'll need to select one of the handles while holding Ctrl+Alt (Win) / Command+Option (Mac) at that point in order to move the handles together again.
Quick Summary So Far …
We've covered a lot of information here about working with direction handles, so before we move on and start drawing some actual curves, let's do a quick recap:
- To add an anchor point, simply click with the Pen Tool.
- To add an anchor point with direction handles extending out from it, click with the Pen Tool, then drag away from the anchor point before releasing your mouse button. The further you drag, the longer the direction handles will be.
- To rotate the direction handles together, hold down Ctrl (Win) / Command (Mac), which will temporarily switch you to the Direct Selection Tool, then click on the end of either handle and drag it around the anchor point. The other handle will rotate in the opposite direction.
- To rotate the direction handles independently, hold down Alt (Win) / Option (Mac), which will temporarily switch you to the Convert Point Tool, then click on the end of either handle and drag it around the anchor point. The other handle will not rotate.
- To resize handles without breaking the connection between them, hold down Ctrl (Win) / Command (Mac) to switch to the Direct Selection Tool, then click on the end of either handle. Drag it towards the anchor point to make it shorter, or drag it away from the anchor point to make it longer.
- To resize handles and break the connection between them, hold down Alt (Win) / Option (Mac) to switch to the Convert Point Tool, then click on the end of either handle. Drag it towards the anchor point to make it shorter, or drag it away from the anchor point to make it longer.
- To rotate the direction handles together after breaking the connection, hold down Ctrl+Alt (Win) / Command+Option (Mac), then click on the end of either handle and drag it around the anchor point. The other handle will once again rotate with it.
Okay, that pretty much covers the basics of how to control the direction handles. Let's see how we can use them to draw some curves!
We've covered a lot of ground so far. We know about anchor points and direction handles. We know that in order to draw straight path segments, all we need to do is lay down a series of anchor points wherever we need them simply by clicking with the Pen Tool, and as we add more and more anchor points, we add more straight sections to our path. We know how to create direction handles and how to rotate them, either together or separately, and how to resize them.
We know how to turn a path into a selection by clicking on the "Load path as selection" icon at the bottom of the Paths palette or by simply pressing "Ctrl+Enter" (Win) / "Command+Return" (Mac) on the keyboard. One thing I didn't mention yet is that regardless of whether our path consists of straight lines,
curves, or a combination of straight lines and curves, converting it into a selection is done exactly the same way, and we've already learned how to do it, which means we're well on our way to mastering making selections with the pen! All we need to do is get a bit of practice drawing curves, which is exactly what we're about to do!
Stále se posouváte? Stáhněte si tento tutoriál ve formátu PDF!
Drawing A Curve
Let's once again start fresh, either by opening up a new blank document in Photoshop or by deleting what you've already done. We're going to draw our first curve so we can put all of our newly-aquired direction handle knowledge to use. First, with the Pen Tool selected and the Paths option selected in the Options Bar, click once somewhere in your document to add an anchor point. Just click, don't click and drag. You should have one single anchor point on the screen when you're done.
Then, move your mouse cursor up and to the right of your initial anchor point. Click again to add a second anchor point, but this time, drag your mouse a little to the right of the anchor point to drag out direction handles. Hold down Shift as you drag to constrain your movement to a horizontal direction. As you drag out the direction handles, you'll see your path appearing as a curve between the two anchor points! The further you drag your mouse, the longer you make the direction handles, and the more of a curve you create:
Click once to add an anchor point, then click and drag out a second anchor point with direction handles, creating a curved path segment between the two points.
Click down and to the right of the second anchor point to add a third anchor point. This time, don't click and drag, just click:
Add a third anchor point down and to the right of the second one by clicking with the Pen Tool.
As soon as you add the third anchor point, a second path segment will appear, joining the second anchor point with the third one. And because our second anchor point has direction handles extending from it, this new path segment is also curved! We now have a nice, smooth arc starting from the first point on the left, then passing through the anchor point with the direction handles up top, and coming to an end at the third point.
One thing you may have noticed, and you can see it in the screenshot above, is that when you added the third anchor point, the direction handle extending out the left side of the second anchor point disappeared. It's still there, Photoshop simply hid it from view. To see it again, use the keyboard shortcut we've already learned to temporarily switch to the Direct Selection Tool, which is by holding down the Ctrl (Win) / Command (Mac) key, and then click on the second anchor point to select it. As soon as you do, the missing direction handle reappears as if it was there the whole time (which it was):

Hold down the "Ctrl" (Win) / "Command" (Mac) key to temporarily switch to the Direct Selection Tool, then click on the top anchor point to select it. The missing anchor point reappears.
With your "Ctrl/Command" key still held down so you still have access to the Direct Selection Tool, try resizing each direction handle by clicking on the end of each one to select it and then dragging it towards and away from its anchor point. Again, hold "Shift" as you drag to constrain your movement horizontally, and watch what happens. As you increase the length of a handle, you get more of a curve, and as you decrease its length, you get less of a curve. Also notice that each handle controls its own side of the curve. The handle on the left controls the curve coming into the anchor point from the left, and the handle on the right controls the curve flowing out from the anchor point on the right.
Here, I've made my handle on the left shorter, and as we can see, there's much less of a curve now than there was originally, almost becoming a straight line. I've also made the handle on the right longer, and as a result, the curve on the right is now much more pronounced. The faint curve is the original for comparison:
Change the shape of the curves by resizing the direction handles. The left handle controls the left curve, and the right handle controls the right curve.
I'm going to undo my changes by pressing Ctrl+Alt+Z (Win) / Command+Option+Z (Mac) a couple of times to set my direction handles back to their original sizes so they're equal length once again. Now let's try rotating the handles. Hold down "Ctrl/Command" once again to access the Direct Selection Tool, then click on the end of either handle to select it and try rotating it around the anchor point. Since we selected the handle with "Ctrl/Command", both handles rotate together. Here I've dragged my left handle down and to the right, and the angle of the curve on the left changed along with it, now appearing as more of a slope as it rises up towards the anchor point. By dragging the left handle down and to the right, I caused the right handle to rotate up and to the left, and again, the angle of the curve on the right changed along with it, now rising above the anchor point briefly before making a steep decent down to the anchor point on the right. Again, the faint curve is the original for comparison:
Rotate the direction handles to change the angle of the curves. Select a handle while holding "Ctrl" (Win) / "Command" (Mac) to rotate both handles together.
The Dreaded "Loop"
One thing you want to avoid is rotating the handles too far, which will cause your path segments to overlap and create loops. Here, I've rotated my handles all the way around so that the left handle is now on the right and the right handle is on the left, and notice what's happened. My path segments are now overlapping each other, creating a loop:
Rotating the direction handles too far causes the path segments to overlap, creating an unwanted loop in the path.
Loops can be caused by rotating the direction handles too far, as I've done above, but more often than not, they're caused by a handle being too long, making the curve too long and causing it to overlap with itself. If that happens, which it does sometimes as you're drawing a path, simply shorten the length of the direction handle. Most people end up creating a whole bunch of loops in their path when they first start working with the Pen Tool, so don't think you're the only one. No need to panic or become frustrated though. As I said, the problem is most likely being caused by a direction handle being too long, and all you need to do is shorten the handle to "un loop" the loop!
I'm going to press Ctrl+Alt+Z (Win) / Command+Option+Z (Mac) a few times once again to undo my changes and reset my path back to the nice smooth arc I started with. Now, what about rotating the direction handles independently of each other? As we learned on the previous page, to rotate the handles separately, instead of selecting them with "Ctrl/Command", we simply select them while holding down Alt (Win) / Option (Mac), which gives us temporary access to the Convert Point Tool. Click on the end of a handle to select it, then drag it with your mouse to rotate it and this time, the other handle will stay in place, breaking the connection between them.
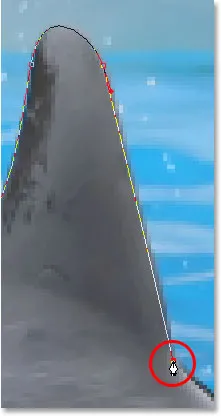
Here, I've selected the handle on the right while holding "Alt/Option" and then rotated it down and to the left. Notice how once again, the angle of the path segment on the right changes to match the new direction of the handle, and this time, the handle on the left, along with the path segment on the left, both stay in place. My path now looks a bit like a shark fin:
Hold down "Alt" (Win) / "Option" (Mac) to temporarily access the "Convert Point Tool", then click on the end of a direction handle to select it and rotate it independently of the other handle.
Moving An Anchor Point
One thing we haven't looked at yet is how to move an anchor point. If you recall, I mentioned on the previous page that the Pen Tool is extremely forgiving, and one of the reasons for it, besides being able to rotate and resize our direction handles after we've created them, is that we can easily move anchor points from one spot to another if we need to. As we've already learned, anchor points anchor a path into place. The anchor points themselves, however, are not anchored into place. You can move an anchor point anywhere, anytime, and any path segments that are connected to it will move and adjust right along with it.
To move an anchor point, hold down Ctrl (Win) / Command (Mac) to temporarily access the Direct Selection Tool as we've already been doing, then simply click on the anchor point to select it and drag it to its new location with your mouse. Any path segments connected to it will move with it to the new location. Here, I've dragged my middle anchor point down a bit from its original location (again, the faint path marks the original location for comparison). Notice how the path itself has changed shape to adjust to the new location of the anchor point:
Hold down "Ctrl" (Win) / "Command" (Mac) and click on an anchor point to select it, then drag it to a new location. Any path segments connected to the point will move with it, changing shape as needed.
Normally, when outlining an object with a path to select it using the Pen Tool, you won't need to move to an anchor point quite as far as what I've done above, but it's very common to go back around your path after you've created it and nudge a few anchor points here and there to fine-tune the path. Once you've selected an anchor point, you can nudge it up, down, left or right using the arrow keys on your keyboard.
Combining Straight Paths With Curves
What if I didn't want both of my path segments to be curves? What if what I needed was for the first path segment to be curved, but the second one needed to be straight? Let's see how to do that. I'm going to delete my existing path and start over again. First, I'll click to add an anchor point to start things off. Then, just as before, I'll click to add a second anchor point up and to the right of my initial point, and this time, I'll drag out direction handles, which will create a curved path connecting the two points, giving me exactly what I had way up at the start of this page:
Click once to add an anchor point, then click to add a second anchor point and drag out direction handles to create a curve.
I now have my initial curve, but I want my next path segment to be straight. If I was to simply click somewhere to add another anchor point right now, I would get another curve because I have that direction handle extending out from the right side of the last anchor point I added. What I need to do is get rid of that one direction handle. Without a direction handle controlling the angle and length of a curve, we get a straight line.
To remove the handle, leaving only the handle on the left of the anchor point, all I need to do is hold down Alt (Win) / Option (Mac), which will again temporarily switch me to the Convert Point Tool, and then I just click directly on the anchor point. When I do, the direction handle on the right disappears, leaving only the one on the left:
Hold down "Alt" (Win) / "Option" (Mac) and click directly on the anchor point to remove the direction handle on the right, leaving only the one on the left.
Now, with the direction handle gone, if I click to add a new anchor point, I get a straight path segment between the two points :
With the direction handle on the right now gone, clicking to add a new anchor point adds a straight path segment between the two points.
I now have a curved path segment on the left and a straight one on the right! What if I wanted the exact opposite? Suppose I needed to start with a straight path segment and then follow it with a curve? To do that, first I'll start by clicking to add an initial anchor point. Then, since I want a straight path segment, all I need to do is click somewhere else to add a second anchor point, and I automatically get a straight path connecting the two points:
Click with the Pen Tool to add an initial anchor point, then click again somewhere else to add a second anchor point and create a straight path segment between them.
I'm going to keep my mouse button held down after clicking to add my second anchor point because I want my next path segment to be curved, and we know that in order to create a curve, we need a direction handle. To add a handle extending out from the right of my anchor point, I'm going to hold down Alt (Win) / Option (Mac), and with my mouse button still down, I'm simply going to to drag to the right of the anchor point. As I do, a direction handle will drag out along with it:
Hold down "Alt" (Win) / "Option" (Mac) and drag out a direction handle on the right of the anchor point.
Notice that the direction handle extended only from the right of the anchor point, not from both sides, leaving my straight path segment on the left in place. And now that I have my direction handle on the right, all I need to do to create my curve is click to add a third point:
Click to add a third anchor point, which creates a curved path segment between the previous anchor point and the new one.
And there we go! I now have a straight path segment on the left, followed by a curved segment on the right. Of course, most paths you draw are going to consist of more than just three anchor points. Let's say I wanted to continue this path, moving in the same general direction towards the right, and I want my next path segment to be curved as well. Just as I did a moment ago, I would leave my mouse button held down after clicking to add my third point. I would hold down Alt (Win) / Option (Mac) and I would drag out another direction handle. So far, we've only been dragging handles out towards the right, but what you really want to do is drag your handles out in the general direction you want the curve to follow. I want to create a curve that goes up and to the right, so I'm going to drag out a small handle in that same general direction:
Drag out your direction handles in the general direction of the curve.
Spropitné! A good practice to get into is to keep your direction handles small when first dragging them out, since you never really know how long or at what exact angle they need to be until the actual curve appears, and the curve doesn't appear until you've added both of its anchor points. Once you've added both points and the curve appears, you can easily go back and make any adjustments you need to the handles. You may even want to wait until you've drawn the entire path before worrying about adjusting the handles.
With my direction handle created, I'm going to click to add a fourth anchor point, and I'm going to drag out direction handles from it as well:
Adding a fourth anchor point along with direction handles extending from it.
I now have a third segment added to my path, this one being a curve. Notice that this curve actually has two direction handles controlling it, one extending from the right of my third anchor point and one extending from the left of my fourth point:

The third path segment now has two direction handles, one on either end, working together to control the curve.
The overall shape of this curve is now being controlled by the length and direction of both of these handles. Watch what happens to the curve when I move the handles. I'll drag the bottom handle down and to the right, and I'll drag the top handle up and to the left. I'll also drag both of these handles longer. The faint curve is the original for comparison:
Changing the direction and/or length of either handle changes the overall shape of the curve. After rotating and lengthening both handles, the curve now appears in an "S" shape.
The curve is now a bit "S" shaped, and that's because the bottom handle is controlling the angle and length of the curve as it flows out from the third anchor point, while the top handle is controlling the angle and length of the curve as it flows into the fourth point. Changing the length and/or direction of either handle will change the overall shape of the curve.
I'm going to press Ctrl+Alt+Z (Win) / Command+Option+Z (Mac) a couple of times to undo the changes I made, so the curve is once again in a simple arc shape as it was a moment ago, and I think I'll finish off this path with another straight segment, which means I'll need to remove that direction handle extending out from the right side of the fourth anchor point. We've already learned how to do that, by holding down Alt (Win) / Option (Mac) and clicking directly on the anchor point itself:
Hold down "Alt" (Win) / "Option" (Mac) and click directly on the anchor point to remove the direction handle on the right.
With the direction handle gone, all I need to do now to add a straight path segment is click to add another anchor point:
The direction handle on the right is now gone, so we can add a straight path segment simply by clicking to add another anchor point.
We could continue this path for as long as we wanted, adding more straight segments and curves, but I think we'll stop here because we've pretty much covered everything we need to know about drawing paths with the Pen Tool at this point. That was a lot of information to take in, especially if this is your first time learning about paths. As I mentioned at the beginning, you won't become a Pen Master simply by reading through this tutorial, just as you won't learn how to ride a bike, or drive a car, learn to swim, or play the piano simply by reading about it. But hopefully you have some sense at this point of how to draw paths with the Pen Tool, how to draw straight path segments, how to draw curves by dragging out direction handles, how to change the length and angle of the curve by rotating and resizing the handles, and how to combine straight and curved segments in a path.
To finish off our look at making selections with the Pen Tool, let's see a practical example of how to select an object with curves.
Here, we have a photo of a couple of dolphins leaping out of the water. Definitely a couple of very curvy creatures:

A photo of two dolphins jumping out of the water.
Let's say we want to select these dolphins so we can use them for a design or a collage, or whatever the case may be. If you were to try selecting them with the Lasso Tool, which is most likely what you would end up using if you didn't know how to use the Pen Tool, not only would you have a tough time, you'd have an even tougher time trying to convince yourself that you were happy with the results when you were done. The reason is because the Lasso Tool simply isn't capable of making curved selections very well. The biggest problem with it, besides being a pixel-based selection tool, is that it relies on you having a steady enough hand to move it smoothly around the curves. Even if you don't suffer from a caffeine addiction, you could drive yourself crazy trying to draw a perfectly smooth curve with your mouse, or even with a pen tablet, and when you've finally given up, you'll still be left with a selection full of rough, jagged edges that just scream "amateur!". No one likes to be called an amateur, especially when there's no need for it thanks to the Pen Tool!
Examine The Object First
Whenever you're about to select something with the Pen Tool, before you begin, take a moment to examine the object carefully to get a sense of where you're going to need to place your anchor points. Forget about all the details in the object and focus only on its shape. Where are the areas where the shape changes direction? Which parts of the shape are straight? Which parts are curved? If there's a curve, is it a smooth, continuous arc or does the angle change at a spot along the curve? Visualize in your mind where you're going to need to place your anchor points, because when you place one, you always want to be thinking about the next one and what the path segment between the two points needs to look like.
A Tool Of Elegance
One more thing to keep in mind is that the Pen Tool is meant to be a tool of elegance . It's not a nail gun or a staple gun. You don't want to just go clicking around your shape adding anchor points all "willy nilly" (that's a technical term). When using it to draw curves, you want those curves to be nice and smooth, otherwise we might as well just stick with the Lasso Tool. To keep the curves flowing smoothly, we need to limit the number of anchor points we use to create them. That's why you want to take a moment to examine the object first and visualize where the anchor points need to be. If you can outline a large section of the shape using only one curve with an anchor point on either end, that's what you want to do, because that's what's going to give you the kind of results you're looking for. The kind of results that scream "definitely not an amateur!".
Let's select these dolphins. I'm going to start my path in the middle of the photo, at the spot where the side of the dolphin on the left overlaps the rear flipper of the dolphin on the right. There's no right or wrong place to begin a path. This is just where I've decided to start. The first part of that rear flipper is straight, so since I don't need a direction handle to create a straight path segment, I'm simply going to click once with my Pen Tool to add my first anchor point, which will serve as the starting point for my path:
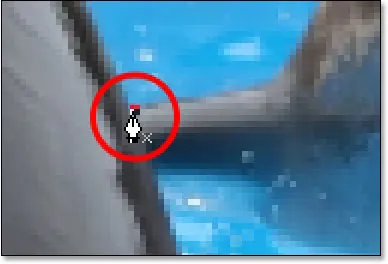
Adding the first anchor point.
As I mentioned earlier, you'll probably find it helpful to zoom in on your image as you're drawing your path. To scroll the image around on the screen as you're zoomed in, hold down the spacebar, which will switch you temporarily to the Hand Tool and allow you to move the image around on the screen by clicking and dragging it.
The top of that flipper actually has a slight curve to it as it approaches the dolphin's tail section, so for my second anchor point, I'm going to click at the point where the flipper and tail section meet, and I'm going to drag out short direction handles, dragging up and to the right in the direction that the tail section is moving. Notice that I've now created a slight curve along the flipper:
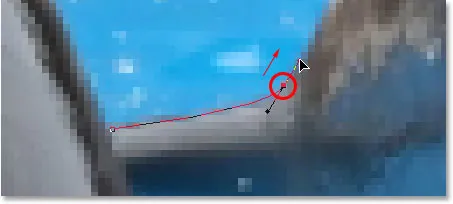
Adding the second anchor point and dragging out small direction handles to add a slight curve to the first path segment.
As I continue up along the tail, I can see that it stays straight for a short distance, followed by a curve to the right, so I'm going to click to add a third anchor point at the spot where the curve begins. This gives me a straight path segment between the previous point and the new one. I know there's a short direction handle extending out from the previous anchor point, which normally means that my new path segment will be a curve, not a straight section, but because the handle is so short and is also moving in the same direction as the path segment, there is no noticeable curve to it. Consider it a "mostly straight" path segment:
Clicking to add the third anchor point, creating a (mostly) straight path segment.
Continuing along, we come to the first real curve in our path. For this, I'm going to need to drag out a direction handle from the anchor point I just added, so I'm going to hold down Alt (Win) / Option (Mac), then drag out a handle in the general direction where I want the curve to flow as it starts. Notice how I'm only dragging out a handle from the one side of the anchor point, not both:
Hold "Alt" (Win) / "Option" (Mac) to drag out a direction handle from one side of an anchor point.
To add the curve, I'll click and drag at the spot where the curve ends, shaping the curve as I drag out the handles until it matches the curve of the dolphin's tail. If I needed to, I could also go back and change the length and direction of the handle at the start of the curve to fine-tune it, but in this case, I don't need to do that:
Adding an anchor point at the opposite end of the curve and dragging out direction handles from it, rotating and resizing them as needed until the curve matches the curve of the object.
The next area of the dolphin is pretty straight, right up until its back begins to merge with its dorsal fin, at which point there's another curve, so I'm going to click to add an anchor point just before the curve up the dorsal fin begins, which is going to give me another "mostly straight" path segment between the previous point and the new point. Then I'm going to once again hold down Alt (Win) / Option (Mac) and drag out a direction handle as I prepare for my next path segment which will be curved:
Click to add an anchor point, then hold down "Alt" (Win) / "Option" (Mac) and drag out a direction handle to prepare for the next path segment.
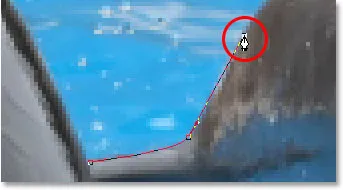
The left side of the dorsal fin consists mainly of one continuous curve upward until it gets near the very top, at which point the shape changes, so to create this curve, I'm going to click and drag at the point near the top where the curve will change direction. As we can see in the screenshot, this adds a curved path segment between the previous anchor point and the new one, but the curve is not yet following along the shape of the fin. It's going to need some fine-tuning:
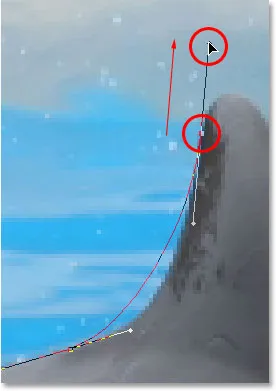
Adding a curve along the left side of the dorsal fin. The curve still needs some adjusting.
To adjust the curve, I'm simply going to hold down the Ctrl (Win) / Command (Mac) key, which gives me temporary access to the Direct Selection Tool, and I'm going to drag the handle extending out from the bottom anchor point towards the right to lengthen it, which is going to pull the angle of the curve in towards the right along with it, lining it up nicely with the curve of the fin. I've also rotated the top direction handles slightly in a clockwise direction just to be nit-picky, but the majority of the adjustment was done using the bottom direction handle:
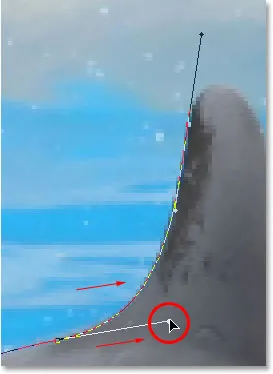
Adjust the curve by adjusting its direction handles.
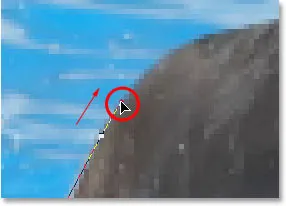
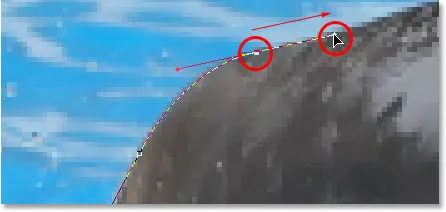
To add a curve around the top of the fin, I'll click and drag on the opposite side of it to add another anchor point with short direction handles. Notice though that we run into a bit of a problem. The direction handle on the left side of the curve is too long and it's pulling the curve away from the top of the fin:
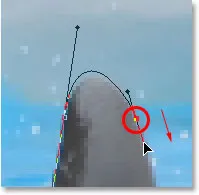
The direction handle on the left of the curve is too long, resulting in the curve not following the shape of the fin.
To fix that, all I need to do is once again hold down Ctrl (Win) / Command (Mac), then click on the end of the handle to select it and drag it shorter until the curve is the proper shape:
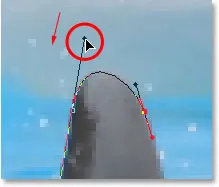
Shortening the length of the direction handle to adjust the shape of the curve.
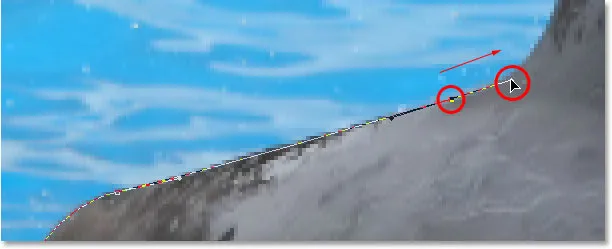
Let's finish creating our path around the dorsal fin. The remainder of the fin is basically a straight line, so I'm going to click at the base of the fin to add another anchor point which adds the straight path segment, completing our path around the fin:
Adding an anchor point at the base of the fin to finish drawing the path around it.
Since you and I would both be here all day if I was to continue commenting on every anchor point, direction handle and path segment as we make our way slowly around the dolphins, and since we've covered everything we need to know at this point, I'm going to go ahead and draw the rest of the path, outlining both dolphins:
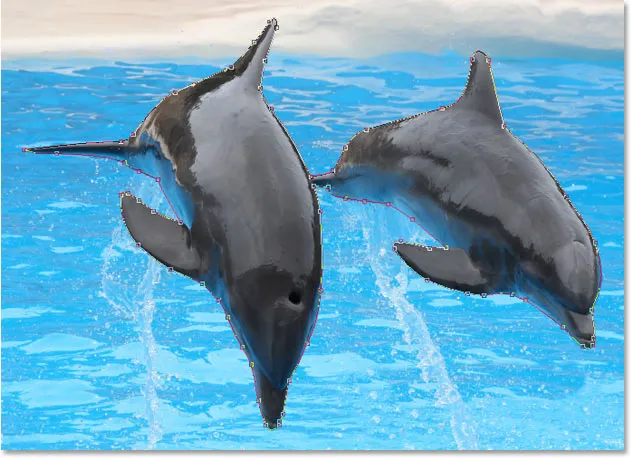
Both dolphins are now outlined by the path.
The dolphins have now been outlined with the path, and if we look at the Paths palette, we can see that sure enough, we have a path in the shape of the dolphins:
Photoshop's Paths palette showing the outline of the dolphins in the preview thumbnail.
As we've learned, Photoshop automatically names the path "Work Path", which means it's temporary and will be replaced if we start a new path. If you wanted to save it, you would need to double-click on the name "Work Path" and rename it to something else, like "Dolphins" in this case. I'm not going to worry about that, since I have no need to save it. All I want to do at this point is convert my path into a selection, and since I'm already in the Paths palette, I'll do that by clicking on the Load path as selection icon at the bottom of the palette:
Clicking the "Load path as selection" icon at the bottom of the Paths palette.
I could also have used the keyboard shortcut Ctrl+Enter (Win) / Command+Return (Mac) . Either way converts my path into a selection, and if I look at my photo, I can see that my path has indeed become a selection around the dolphins:

The path around the dolphins has now been converted into a selection.
Kam dál?
A tady to máme! The dolphins are now selected and ready for whatever plans we have for them. And with that, we wrap up our look at drawing paths and making selections with the Pen Tool in Photoshop! Další informace o nástrojích pro výběr Photoshopu naleznete v našem článku Jak provést výběr v sérii Photoshop. Navštivte naši sekci Photoshop Basics, kde najdete další témata Photoshopu!